Resale Market Authentication Analyst
Authentication analyst covering the resale market, marketplace verification programs, and counterfeit trends.
Published September 2026 · Contact
Intake Is Where the Loss Happens
A consignment store or pawn shop rarely loses money on a counterfeit when it sells it. It loses money when it takes it in. Once you have paid a seller, advanced a loan, or accepted an item on consignment, the counterfeit is your problem: the cash is gone, the item is unsellable, and every step after that (listing, shipping, the buyer's complaint) only adds cost.
The scale of the problem is not small. The OECD and EUIPO's Mapping Global Trade in Fakes 2025 report estimates that counterfeit goods made up about 2.3% of world imports in 2021, roughly USD 467 billion, with clothing, footwear and accessories such as handbags among the most-seized categories. Some share of that ends up offered across a resale counter.
What a bad intake decision costs a business:
- The purchase price or loan. A pawn loan secured by a fake is an unsecured loan to someone who may not come back.
- Refunds and chargebacks. A buyer who later has the item rejected by an authenticator will ask for their money back, and without an intake record you have little to contest a card dispute with.
- Marketplace penalties. Resale platforms remove counterfeit listings and can suspend sellers who list them, which can cut off a sales channel you depend on.
- Legal exposure. In the US, knowingly trafficking in goods with counterfeit marks is a federal crime under 18 U.S.C. § 2320, and trademark owners can also bring civil claims. The word that matters is "knowingly": a documented, consistent intake process is the best evidence that you acted in good faith. (This is general information, not legal advice; speak to a lawyer about your jurisdiction.)
- Reputation. One public "I bought a fake from this shop" review costs more than most individual items are worth.
The angle of this guide is simple: authentication is a process problem at the counter, not a knowledge problem. Staff do not need to be expert authenticators. They need a repeatable routine that screens out the obvious fakes in-house, captures the evidence an expert needs, and routes the rest to someone qualified before money changes hands.
Step 1: Seller Identity and Provenance Questions
Start with the person, not the product. Take and record government ID for every seller or borrower, which pawn and secondhand-dealer rules in many places already require. Then ask the same questions every time, and write the answers down:
- Where and when did you get it? A boutique, a department store, a resale platform, a gift, an inheritance. Vague answers are not proof of a fake, but a story that changes is a signal.
- Do you have the original receipt or order confirmation? An email confirmation from a brand's own site or boutique is useful context. Note the store, date and amount.
- Has it been authenticated before? If so, by whom, and can you see the certificate? A certificate you can verify on the issuer's website is worth far more than a paper one.
- Has it been repaired, refurbished or had parts replaced? Replaced hardware, straps or linings are common and change how an item should be assessed and priced.
- Why are you selling, and how quickly do you need the money? Pressure to close fast is the most common counter-side red flag.
Keep the questions standard across staff. Consistency protects you twice: it catches inconsistencies in the seller's story, and it is your record that the same care was applied to every item.
Step 2: Receipts, Boxes, Cards and Dust Bags Are Context, Not Proof
Sellers often lead with the packaging: "It comes with the box, the dust bag, the card and the receipt." Treat all of it as context, not evidence. Counterfeit boxes, dust bags, authenticity cards, care booklets and even printed receipts are sold separately and bundled with replicas. Genuine packaging is also routinely paired with fake items, because a real box is cheap to buy on its own.
What packaging can do is contradict an item. Useful cross-checks:
- Does the model name, colour or reference on the box label match the item in front of you?
- Does a receipt's date, store and amount make sense for that model and that era?
- Does a card or certificate number match anything on the item, where the brand links them?
A mismatch is a reason to slow down. A match is not a reason to relax. Never price or lend on the strength of the paperwork alone.
Step 3: Capture the Standard Photo Set on Every Item
Photograph every item at intake, whether or not you think it needs outside review. The photos serve three jobs: they let a second person (in-house or external) assess the item, they document the item's condition when it entered your hands, and they are your evidence if a buyer disputes it later.
Use a plain background, daylight or a neutral lamp, no filters, and keep each detail shot sharp enough to read small text. The standard set:
- Overall front, back, sides and base. Shape and proportions are one of the first things an expert checks.
- Logo and brand stamp. The heat stamp or embossing on leather goods, the dial logo on a watch, the print on a label.
- Stamps and heat stamps close up. Straight-on, with light raking slightly across the surface so the depth of the impression shows.
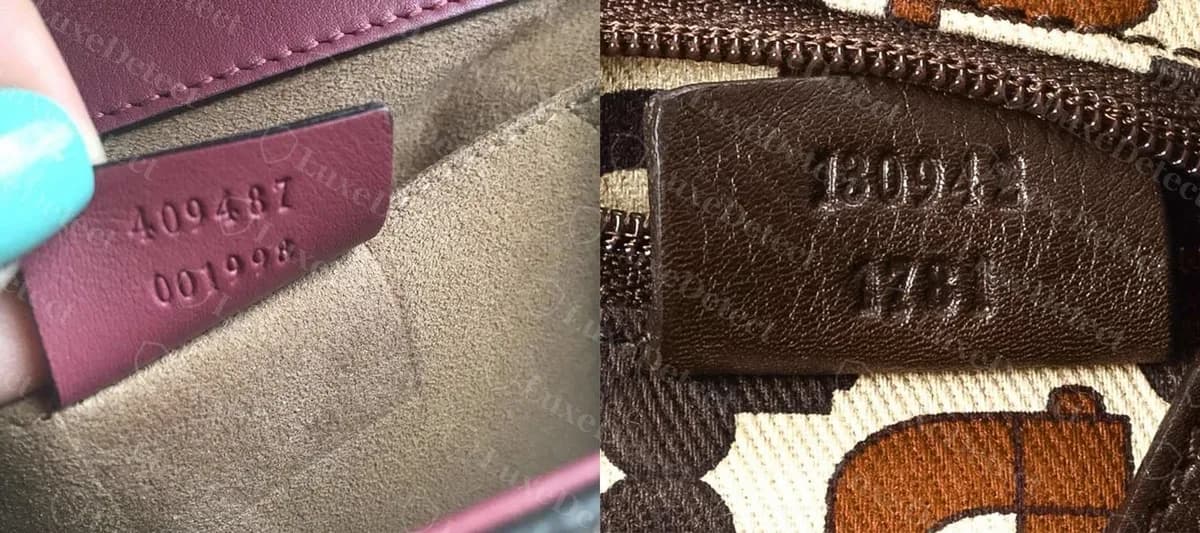
- Serial number, date code or reference. Every character legible. On watches, the case reference and serial where accessible without opening the case.
- Hardware engravings. Zipper pulls, clasps, buckles, feet, turnlocks, crown and clasp on watches.
- Stitching. A straight run of stitches on a handle or edge, plus the corners, where stitch count and slant are easiest to judge.
- Zipper. The pull, the back of the slider and the teeth or tape where a maker's mark usually sits.
- Interior label and lining. The made-in label, interior tags, lining fabric and any pocket stamps.
Name the files with your stock or ticket number so they never get separated from the item record. If you plan to use a third-party authenticator, check their photo guidelines once and fold any extra angles they want into your standard set, so staff never have to go back to a seller who has already left.
Step 4: Use Free Code Decoders as a Screening Step
Serial numbers and date codes are quick to check at the counter, and a free decoder turns a string of characters into a production era and sometimes a factory. LuxeDetect's free tools cover the codes that turn up most often at intake:
- Louis Vuitton date code checker
- Chanel date code and serial checker
- Hermès date stamp decoder
- Gucci serial number checker
- Dior date code checker
- Rolex serial number lookup
There are also decoders for Prada, Saint Laurent, Fendi, Goyard, Bottega Veneta, Omega, Cartier and more on the free tools page.
Use them for what they are good at: catching contradictions. A code format that never existed, a production year later than the style was made, or a factory code that disagrees with the made-in label are all strong reasons to stop. What a decoder cannot do is confirm authenticity. Code formats are public and counterfeiters copy them, often from genuine items, so a clean decode on its own proves nothing. We cover why in does a serial number prove a bag is authentic, and the differences between the free checkers are in our serial number checker comparison.
Step 5: Red Flags at the Counter
None of these proves a fake on its own, but each one should move an item from "quick screen" to "hold and send out":
- Price well below the going resale rate, especially for current, in-demand models.
- Multiple "new" pieces of the same current model from one private seller.
- A story that changes between questions, or a seller who will not leave ID.
- Urgency: the seller needs cash now and will take much less to close today.
- Too much packaging. Every card, booklet, ribbon and receipt, all pristine, on an item described as used for years.
- A code that fails to decode, decodes to the wrong era for the model, or is missing where the brand always places one.
- Strong chemical or glue smell, or plastic-feeling "leather".
- Hardware that feels light, is plated where it should be solid, or has engraving that looks shallow or blurred.
- Uneven, crooked or loose stitching on a brand known for tight, even work.
- Fonts, spacing or spelling on stamps and labels that look off against a known genuine example.
Step 6: Decide: Accept, Hold or Decline
Write your decision rules down so staff are not improvising on a busy afternoon. A simple three-outcome policy works for most shops:
| Outcome | When to use it | What to do |
|---|---|---|
| Accept | Low-value item, clean seller story, passes the in-house screen and code check, no red flags | Record the photo set and answers, complete the transaction |
| Hold | Anything above your value threshold, any single red flag, or any item staff are unsure about | Take the item on a documented hold (or pay nothing yet), send the photos out, decide when the result comes back |
| Decline | Failed code check, several red flags, seller refuses ID or refuses to let you photograph the item | Decline politely without accusing the seller; record the attempt |
Set the value threshold in money, not in feel. For example: every handbag, watch and fine jewellery piece over a set price is held for a third-party opinion, no exceptions. The exact number depends on your margins and how much a single loss would hurt.
Declining does not mean telling someone their item is fake. "We're not able to take this one today" is enough, and it avoids a confrontation you have no reason to have.
A Tiered Approach: In-House Screening vs. Third-Party Authentication
Most shops end up with two tiers.
Tier 1, in-house screening. Trained staff check the seller, the paperwork, the code and the obvious construction points. This tier is fast and cheap, and its job is to decline the obvious fakes and pass through low-value items where a mistake is survivable. It is not designed to catch high-grade replicas, which are made specifically to pass this kind of check.
Tier 2, third-party authentication. Anything above your value threshold, anything with a red flag, and any brand your staff do not see often goes to a specialist authenticator with the standard photo set, or physically where the item warrants it. The cost is small next to the purchase price or loan it protects.
How to Choose an Authenticator
Compare providers on the things that matter to a business, not on marketing claims:
- Turnaround. Can they return a result while the seller is still at the counter, or at least the same day? Check which speed tiers they offer and what each costs.
- Written, verifiable certificates. You want a written result you can show a buyer, ideally one the buyer can verify independently on the provider's website.
- What the guarantee actually covers. Some providers refund the fee if they get it wrong; some offer a financial guarantee on the item's value, usually with limits and conditions. Read the terms and know which you are buying.
- Brand and category coverage. Make sure they cover the brands and categories you actually take in, including watches and jewellery if you handle them.
- How the review is done. Photo-based, physical, or both, and whether more than one authenticator reviews each item.
- Business features. Volume pricing, invoices for your accounts, a dashboard or API if you process a lot of items.
Whichever provider you pick, use one consistently. Mixing providers item by item makes your records harder to follow and harder to rely on if you ever need them.
Step 7: Document Every Decision
The record you keep at intake is what protects you later: in a chargeback, a marketplace dispute, an insurance claim or a conversation with law enforcement. For every item, keep:
- Seller ID reference and the answers to the provenance questions
- The full intake photo set
- Code check result (tool used, date, output)
- The decision (accept, hold, decline), who made it and why
- Any third-party result and certificate
A certificate is also a selling tool. A buyer who can check the result for themselves is more likely to pay your asking price and less likely to dispute it. Every LuxeDetect authentication comes with a certificate that anyone can look up by its ID on the certificate verification page, so you can print the ID on a tag or include it in a listing.
Training Your Staff
A checklist only works if the people at the counter use it the same way. A few practical points:
- Train the process first, brands second. New staff should know the intake routine, the photo set and the decision rules before they learn any brand details.
- Build a reference file of confirmed genuine items that have passed through your shop: the same standard photo set, labelled by brand and model. Over time it becomes your best in-house reference.
- Review the misses. When an item you accepted is later rejected, walk through the intake record as a team. Which step would have caught it?
- Give staff permission to hold. The most expensive mistakes come from staff who felt pressure to close. Make "I'll hold it and get it checked" the default, not a failure.
- Keep training realistic. No short course turns a new hire into a professional authenticator. For more on what training can and cannot do, see our piece on whether you can learn to authenticate.
Printable Intake Checklist
Print this and keep it at the counter.
- Take and record seller ID.
- Ask the five provenance questions and write down the answers.
- Note all packaging, cards and receipts, and cross-check them against the item. Treat them as context only.
- Take the standard photo set: overall, logo, stamps, serial or date code, hardware engravings, stitching, zipper, interior label.
- Run the serial or date code through a decoder and record the result.
- Check the counter red-flag list.
- Apply the decision rule: under threshold and clean, accept; over threshold or any red flag, hold and send out; failed code or several red flags, decline.
- Record the decision, who made it, and why.
- File any third-party certificate with the item record and put the certificate ID on the listing.
A failed code check or refusal to provide ID is enough on its own to decline. Anything above your value threshold is held, however confident the counter feels.
Authentication for Your Business
LuxeDetect works with pawn shops, consignment stores and resellers that authenticate inventory every day. Business accounts get prepaid credit bundles with bonus credit, business invoices, the same expert review as single orders (at least two authenticators on every item), and a certificate for every result. Turnaround options run from 24 hours down to 30 minutes, and higher-volume accounts can use a dashboard or the API. If we get an authentication wrong, the fee is refunded under our refund policy.
See LuxeDetect for Business for credit bundles and to request a demo for your shop.
FAQ
How should a pawn shop authenticate designer bags?
Use a fixed intake routine: record seller ID, ask standard provenance questions, photograph the item to a standard set (overall, logo, stamps, serial or date code, hardware, stitching, zipper, interior label), and check the code with a free decoder. Low-value items that pass can be accepted in-house; anything above your value threshold or with a red flag should go to a third-party authenticator before you lend or pay.
Is a box, dust bag or authenticity card proof that an item is real?
No. Boxes, dust bags, cards and even receipts are counterfeited and sold separately, and genuine packaging is often paired with fake items. Use packaging only to look for contradictions with the item, never as proof it is genuine.
Can a serial number or date code checker confirm an item is authentic?
No. A decoder tells you whether the code follows a valid format and what era it points to, which is useful for catching contradictions. Counterfeiters copy valid codes, so a clean result only means the code does not rule the item out.
What should a consignment store do if it suspects an item is fake?
Hold or decline the item rather than confronting the seller. Record the attempt, including the photos and the seller's answers, and if you already have the item, get a written third-party opinion before deciding what to do with it.
Which items should always go to a third-party authenticator?
Set a value threshold for your shop and send everything above it, plus any item with a counter red flag, any brand your staff rarely see, and every watch or fine jewellery piece you are not equipped to inspect. The fee is small compared with the loan or purchase price it protects.
What records should we keep for each item we take in?
Keep the seller ID reference, their answers to your provenance questions, the full photo set, the code check result, your decision and who made it, and any authentication certificate. That record is your evidence in chargebacks, marketplace disputes and insurance claims.